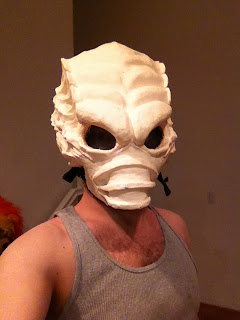
The first thing that had to be done, was to retrieve the gas mask from its clay prison! I was going to be needing it, seeing as the whole thing was based around that being the attachment point to my face.
Oh, the poor sculpt, but that's fine, I have a perfect cast now!
Ermegherd, every time I look at it, it's awesome! So from the raw pull, it was time for some clean-up, I trimmed off all the flashing around the edges of the mask, cut off the lower hose section that wasn't needed, and then carefully trimmed out the eye holes and sanded it all down smooth so as not to have any ragged edges that will catch on anything.
After that, I had to figure out how to 'glue' the mask to the inner surface, and I actually tried a few different things, starting with super glue, and soon realising that wasn't going to work on the smooth inner surface. I then tried scratching up the inside for a bit of traction, and then following it up with a more sturdy epoxy.
Bad idea! Epoxy produces some pretty noxious fumes, and there was no chance I was going to be wearing that near my face all night, so I stripped that off and decided to use the very material the mask was made of.
I don't have pics of that process, I started sacrificing documentation at this point to get things done, so I'll just try to describe it. I basically masked the eyes and edges I didn't want affected, placed the gas-mask carefully in the mask-proper, and then slushed some more urethane resin around inside, this basically fused the masks together to become one useful whole.
It worked out amazingly, though I had the mask sitting too low, so more of the chin was visible than I intended, but the eye line was better than I expected!
Here's a little video of it moving around.
Next up was how to get in and out of the mask easily, and possibly when drunk. :P
It was molded to my head in such a fitted manner that I definitely wouldn't just be able to slip on and off, and I also have a pretty massive head as far as helmets go in general, so I decided that the back section could be flipped up like a 'flap' and you put your head in through the gap, and secure the back panel again.
Again, time was running out fast, and I was really worried that cutting the mask apart at this point would result in further failure, but I bolstered that attitude with the knowledge I could just pull another awesome version of the mask in about a 30 minute time frame.
Once that was done, I set about dealing with one of the most important parts, that has so far gone pretty much neglected. The spine!
I would have liked the whole thing to be flexible by the time I was done, but it was being really hard to work with, so long as it had the metal rods in it. I scrapped the rods in the end, replacing the central column with a wooden dowel, reducing the overall length of the spine by about half, and then drilling out a left and right hole on either side of the dowel.
I then took two screws of about two inch length and placed them in the holes for now.
Quickly after that, I dammed up the nose section of the mask, and filled it with resin, just enough to support the weight of the spine. The colour on the pics above are inks that I used to transfer the positions of the holes to the mask, and drill out more sections there.
I moved back to the rear head head plate, where my idea was to attach the back with powerful magnets. I positioned them appropriately, built some dams around them, and 'glued' them into place using more resin, again, I couldn't afford to have any toxic glue fumes as I'd be wearing this in the next day or two for a whole night!
It's a complete mess in there, like a bomb went off, but a little bit of cleaning should sort that out.
As I was drilling down bits, I accidentally hit some of the magnets, but look at beautiful magnet fragments being positioned by their fields.
Interesting failure point here that the magnets were close, but not close enough to the edge to hold the back plate in place while I was walking, but fine when standing. I realised that while the magnets I used were really strong, they couldn't defeat their own weight pulling the mask back down when I took a step, so it fell off onto the floor, cracking it (and some hasty repairs had to be made!).
I hastily removed the magnets from the top and replaced them with two loops of Velcro strapping to keep them in place, and make sure that if it fell, it would still be attached to the helm. It worked amazingly! With the reduction in weight, the too better positioned, lower magnets, held really well, and when I did jar a motion a little too hard, the back would only fall about an inch before the Velcro straps caught them. I'd then just reposition, which the magnets helped with, and I was back on form.
And this is the point I lose it, no more documentation, none on the painting process, just straight to the end now.


No comments:
Post a Comment