Well, I've worn the Sandman helm out and about a few times now, the most recent being Wasteland Weekend, a fantastic desert event out near California City in Nevada.
While out and about during the day, I got snapped a couple of times, and I absolutely adore these shots. They'll definitely be going into the final gallery once I get round to re-making the helm with the benefit of unlimited time on my hands. :)
After a morning of furious painting, starting with a white primer layer, followed bu successive layers of airbrushing, I rushed out the paint job on both the spine and the mask itself in a few hours, and it's not exactly what I would have liked, but it's damn good for the time frame.
Post mortem fixes are at the bottom, but let's get to it first!
We attended the masquerade ball in style, and got a lot of comments and pictures on the costumes and how recognisable we were as a theme.
Enjoy the pics, and the fruit of all that labour! I already have planned improvements for the second version, when I no longer have a deadline, and can spend a lot more time researching making it functional, but I wore it for a lot of the night, and it was amazing.
As you can see, my two friends were Delirium and Death. I actually crafted the Ankh to attach to the choker for Death, and she did a fantastic job on nailing not only the rest of the outfit, but also the attitude.
As for Delirium, I gave here the Nemo balloon idea, the fishnets and corset, and she went on with the crazy attitude that had people running away in case she touched them and sent them off to crazy town.
The whole night was amazing, and seeing the pictures afterwards I can only imagine how surreal it must have been for those around us. The last two shots here are fantastic, the first shows the side detail in all its glory, and how it fits with the whole outfit as we slink through the crowd, like The Endless would, practically unseen.
The final shot was right at the very end of the night, and we clearly had some wear and tear apparent, but held up well. All in all, a vast success!
Things that fell short:
1) My Sclera contact lenses didn't arrive on time, so I had to make do
with normal black costume lenses, seems like a shame in the pics, but
the flashes were illuminating the interior, in the normally dull
environment, I'm sure it looked authentic.
2) I started out
the project with the idea that I would make a robe, form fitting, with
led strips in the interior of the hem, which would make it look like
flames. I had to dump that, because I know nothing about tailoring
(yet!) and it would probably have taken me away from the mask
3) The eye sockets needed more work, and that's mainly because I
positioned it incorrectly in my rush, you can see my eyes sat low, which
made it hard to go up and down stairs! Next time, the eyes will be
closer to he brow.
4) Colouring was rushed, I'd love the opportunity to do it again at a slower pace.
5) The Dreamstone, in my attempt to make it look diffuse, came out a bit
less like a gem, and not 'sharp' enough for my liking, I wanted more of a 'hard cut gem' look. It also came out just a touch too big.
6) I would like the spine to be a bit
more flexible next time, while maintaining its shape, not flapping all
over the place. It was rigid for the night, which also didn't help going
down stairs.
After a bit of prying, I took off the mother mold, and pulled the glove mold up and over the sculpt, which held up reasonably well and almost completely intact. I thought I was going to decimate it!
Look at that beauty, and not only that, when its inside out, it kinda looks like a Creature from the Black Lagoon mask, double-bonus! Look at me, so delighted to be a creature.
Next up, a double first time attempt for me, and that's 'slush casting' with a urethane plastic. This basically involves a two part liquid formula that hardens to a plastic consistency, you pour it into the mold, roll it around so that it covers every surface, and in about 10 minutes it sets to hard plastic. Amazing stuff!
But, before you think its all Daisy's and Snowflakes, I failed pretty hard. Once again, I didn't quite understand how the material worked, and in my excitement, I used too much, poured a big wad of it in there and started rolling it about like the dickens.
How the resin works is interesting. The larger the mass in a specific area, the faster the catalysing reaction will occur, so if you happen to have a big splodge or puddle of it anywhere, you can bet that's gonna kick faster than the thin coating everywhere else.
Well, that's what happened to me, I got the interior surface covered up to a point, and then as it was puddling in the bottom, it just immediately went solid. That stuff kicks fast! I was surprised and pretty bummed out, but I needed to pull it out anyway, check it out, it might have been a failure, but it gave me a preview of its potential!
I used a lot less resin this time, and did it three times, immediately building up on top of the last layer just as it had set. This resulted in a super hard, perfectly cast mask which I did a little victory dance to!
Here it is, in all its glory!
Here's a comparison shot, you can see how thin the first one was in places, it just started deteriorating as I handled it, the other is just awesome. So awesome, it was awesome before awesome even became a word.
At this point, I would have liked to spend some time with sandpaper knocking out some of the sculpt marks, and buffing some of the larger areas out to a smoother texture, but I didn't have time to spare, so it would have to wait till the next pull after the masquerade.
Nope, looks like last night's extended experiment resulted in nothing more than the resin hardening in the rough pattern (I'm really not sure what I was expecting, I think I might have been too tired to consider this result)
I achieved nothing more than taking the sharpness away from the edges, and still having the rough pattern. At least it was a tad more shiny now, I'll take that at least.
Well, I don't have pictures of the rest, but it was a simple matter of adding some 'fake highlights' in white around the edges to make them SEEM sharper (and old trick I learned from my miniature modelling days), and assembling the 'glass' and 'mount' around a long gold chain.
In the next iteration, here's what I'll change, having more time:
1) Start with a wooden block, and start a bit smaller. 2) Sand down the edges carefully, get as few imperfections as possible, and if I lose an edge, start again with a new block.
3) Make sure there is an indent or dam to allow more resin to set around the edges, making it stronger.
4) Either add colouring to the resin before pour, are add it to the inside after it has set, this should help the outer layer seem clean and shiny, while the colour is in there deep. 5) Scratch up the INSIDE of the final resin cast, giving the diffuse factor, while maintaining the sharp outer edges. 6) Make my own L.E.D. layout and patterns, while those ones were great, the predictable pattern sometimes put them in sync, and it didn't really look random. Nonetheless, to someone not staring at it, it seemed more than random enough.
That's it, here's a pic from the night, where I was about half way toward getting dressed.
So here I am, back at the helm, and sure enough, I wasn't too impressed with the middle section. Only one week left till finish, but I do like a challenge!
I fiddled around with it a bit, but I already knew the writing was on the wall, I just didn't like it's current incarnation. Here is where I ended up.
So I originally got the idea of copying the tail-bone of the medical spine I had, and then it occurred to me, instead of 'copying it', why don't I ACTUALLY copy it, making a mold and a cast, that way I could get two exactly identical bones sections for either side.
I spent a while preparing the spine that you can see here (below) by eliminating the undercuts that would cause the mold to be stuck to the original, but thanks to the wonderful flexible properties of silicone, I didn't need to go too far, and I could keep some deep depressions for further detail.
The mold, pretty dirty, but I was trying to save money and therefore silicone. Turned out great though!
I then pulled two copies using some clear urethane resin I had lying around. I also recently bought some aluminium powder for future metal-looking castings, hence why they turned out grey.
And now for the interesting part! I cut out the work I was unhappy with, right down to the head cast. I then placed the tailbone against the head with some clay underneath to support its weight and keep it in place, after that, it was a matter of taking the lines of the tail-bone and making them 'flow' into the other sculpted detail.
I think you'll agree this is vastly better!
Spent some time cleaning up the ridges, the Y shapes and making sure the tail bone blended seamlessly with the rest of the head. I also decided to remove the detail from the lower helm closest to the neck, I would probably need it o be stronger down there, so detail might not be a good idea.
Looks great!
I went straight to work on the other side, measuring and copying the whole time. This time, with the tail-bone being an exact copy, I just needed to place it carefully, and the rest was a piece of cake. I busted out the other side.
Cleaned up the remaining pieces of the left side, and done my last adjustments to make sure both sides are as symmetrical as possible (without actually being symmetrical, that would just be weird from an anatomy standpoint!)
And here we have it, finished, both sides, and front. All smoothed out and pretty. Sadly it was one HEAVY sonuvagun, carting it about must have given me the best workout I've had in a while!
As soon as I can, onto molding and casting this beast!
And for your viewing pleasure, a video so you get a better idea of how it looks in real life. (Is this real life!?)
With all the excitement focused on the helm, I decided to take a break and take another experimental stab at the Dreamstone to see if I could produce something of considerable 'gem-like' quality.
Rather than follow my own previous advice by using wood, I, for some unknown reason, decided to try again with foam core board.
The difference this time was that I had recently purchased a belt sander, and I was thinking that I could maybe use the same technique, but with the sander, would be able to precision sand down to the lines I wanted.
Seriously, if you do this yourself, just use wood, I'm a glutton for punishment and trials.
Here is another round of pics.
As you can see, the upper surface is smooth, a vast improvement on the last attempt, however, thinking ahead, I thought this might not be the best-case scenario, as I wanted to put lights in there, and have the diffusely blink. A clear outer surface would probably leave the full glare exposed, so I basically just peeled off the top layer, leaving the foam exposed underneath (the rough texture would therefore translate into a diffused glass pattern, or so I hoped, seemed to make sense in my head).
I then went about molding the stone, and as usual, I like to experiment, so I used a little of a trial pack of Smooth-On's Oomoo silicone rubber, which has the excellent properties of not needing to be vacuum degassed (remove the air bubbles that might cause you problems later). I don't have a vacuum chamber, so this seemed like a good time to test this out on a rough surface.
I then went ahead, after it has set, to pouring some Alumilite Clear resin in there and slushing it around till it set. The hard part here was getting it to that the edges were thick enough to support the rest of the shell. I didn't quite get this right, and it would be the same with the helm later, I need to sculpt in a dam or indent so that the negative will be able to accommodate more resin at the very edges.
Here is the mold after a couple of resin pours.
While that was fully curing, I finally took my own advice, and started with wood to construct the frame of the Dreamstone. I took some hobby wood, cut the size out, and then sanded down the interior bevel with a Dremel sanding bit.
I then took some progressively higher and higher grit sanding paper to it until the edges were perfectly smooth. I went and drilled two decent sized holes in the back surface, more on the reason for this next.
So completely by chance, while I was shopping for pieces of Soo's Delirium costume, I came across some very cheap and cheesy 'diamond rings', which were actually just hunks of plastic on a plastic ring mount, with blinking L.E.D.s in them. I guess some ladies like the bling bling to literally bling.
I grabbed a couple of these, took them back and cut the L.E.D. circuits from the housing, leaving me two small boards with three L.E.D.s on them. These already had three sets of blinking patterns built into them, so I was delighted I could just dump learning simple electronics for post project, and use these in the interim (weight off my shoulders knowing I might be able to achieve the Dreamstone effect I wanted without any effort!
To give the 'cloudy' effect, I already knew from years of art as a kid that if you wanted clouds, you used cotton wool, so another quick test later verified that I was right (past-me was smiling), here's how it turned out.
I decided to put the whole assembly together as a preview, two L.E.D.s, wood frame and clear Dreamstone. Here is a video of how excellent it came out.
I pulled the Dreamstone casing from its mold, and started with progressive layers of a red ink wash until I achieved the desired richness. Also, despite the foam core being ridged (take a look at the sides, you can see in the cast that the 'edges' where the individual boards were glued came out, like I say, use one piece of wood and every surface will be super smooth, don't make my mistake!).
Still, I like the sharpness of the edges, and it would definitely do.
While the ink was drying, I took some Rustoleum gold primer to the Dreamstone mount, which handily sat on the steel floor post I got with the medical spine!
Once I was happy with the red colour of the Dreamstone, I started wondering if I could make it more 'glassy' and shiny, without actually losing the diffuse element (despite the fact that the cotton wool was going to be doing most of the work). At his point, if I had used wood, I probably wouldn't have the problem, and the cotton wool and paint job would have done the work, but this is a fine example of knowing when to stop.
I didn't know when to stop, so I pressed ahead with adding another layer of Crystal Clear resin on top, thinking it would smooth things out.
Called it a night here, and went to bed, hopeful for the next day!
So much to my horror, I realised I only have about a week and a half left to finish this project, oh procrastination and real-life, how you consume my time! *shakes fist*
Seriously, time was running short, and it started to dawn on me that I was messing around again, tinkering with details when the main forms hadn't even been finished yet. I therefore went straight to measuring and working on the other side, copying as much as I can, as quickly as I can.
Here you can see me trying to block out what I had created on the other side.
Yep, guess who kept losing his mid-line... thankfully, having already found it, there were enough remnants for me to recreate it each time I worked over the area.
And for a laugh, I bought a 'glam rock' wig from my local costume store, cut it ragged with a pair of scissors, and I think I successfully achieved a Morpheus 'do. Wig was awesome, shame about the fool wearing it. :p
Pressing on from last time, here are more sculpting updates.
I decided to over-accentuate the brow ridges and made the eyebrows heavier, there was a lot of raking, and moving things around, and I also continued to work on the side, pressing on with the spinal and bone pattern.
At this point, I also wanted to get started on the upper part of the 'spine respirator', i.e. the mount point for the medical spine. I knew I'd need enough space to make sure my nose and mouth still fit in there, but also that I'd be able to breathe, and it would be strong enough to support any weight that I mount onto it.
Next, I started copying the shapes to the other side, cleaning up the eyes and trying to get a modicum of symmetry. I used the tricks I'd learned from some of the tutorials, like measurements, and re-establishing the mid line. I also started smoothing out the roughest rake marks and smoothing the 'right' side down.
I can't emphasise enough how helpful a 'lazy susan' was here, that little rotating platform under it. Beats moving around all the time, that's for sure.
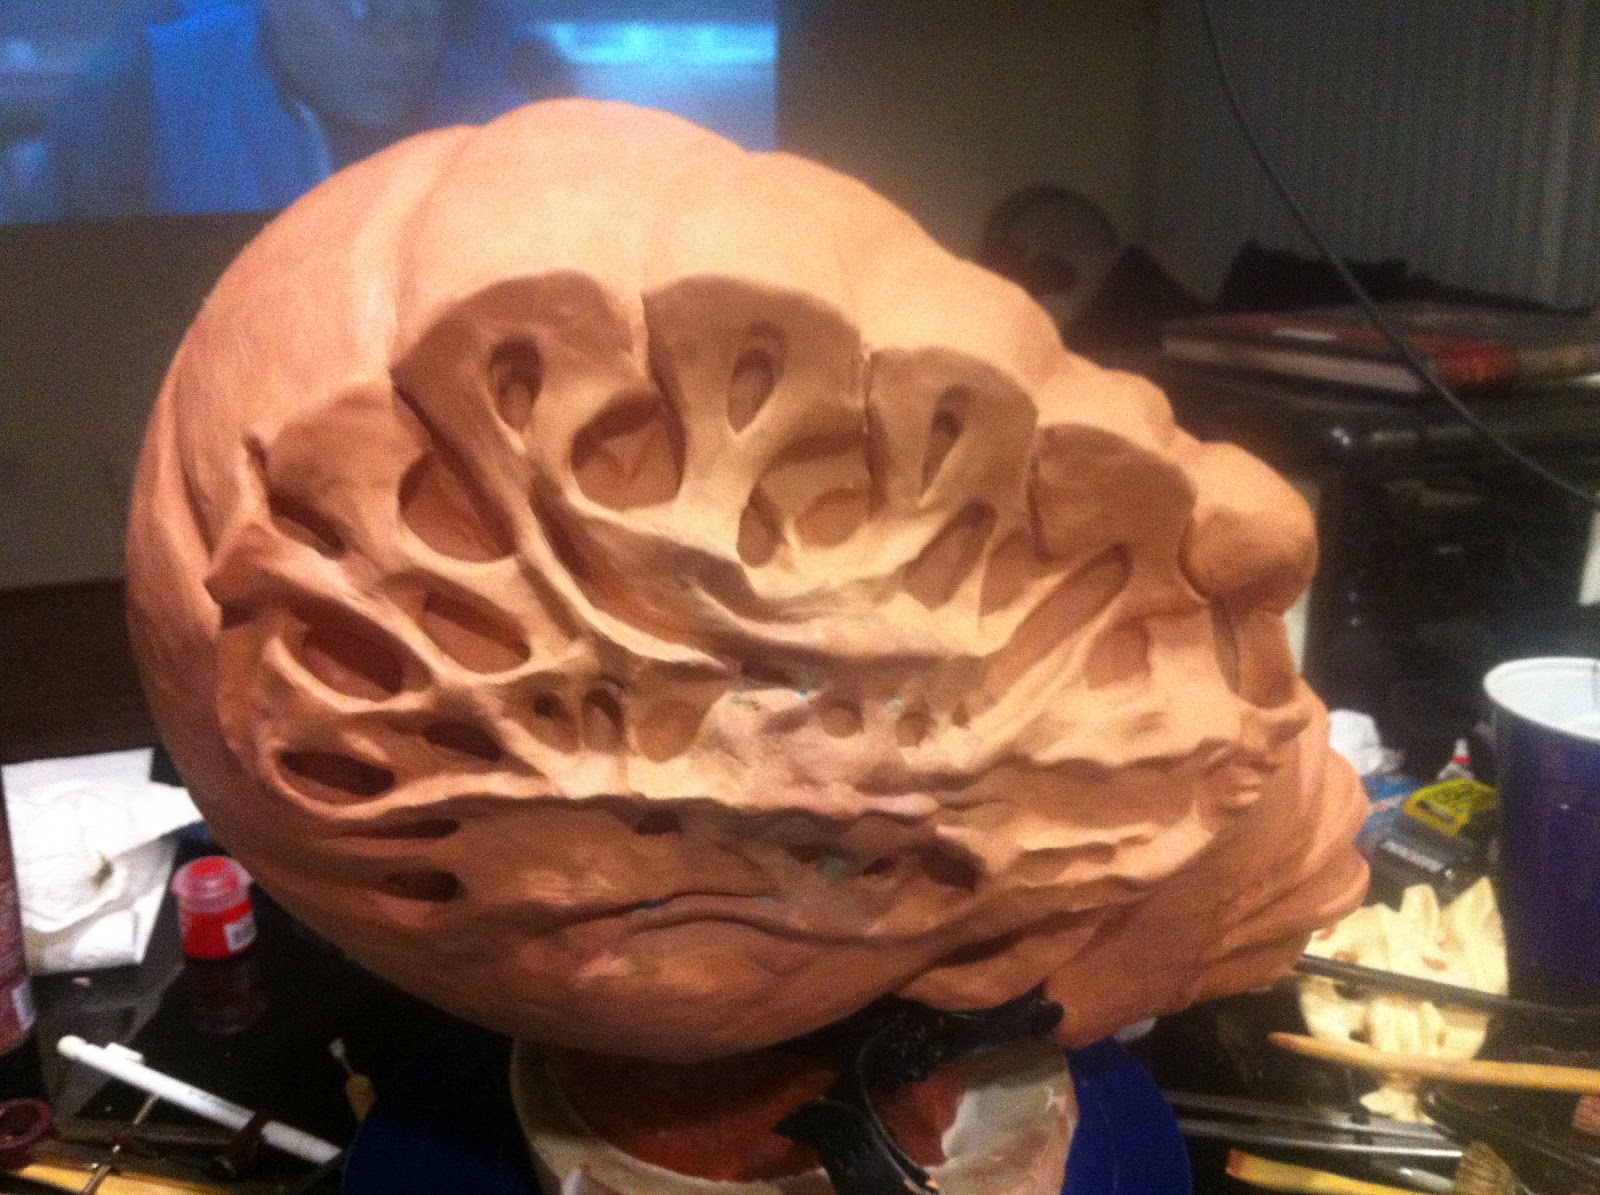
Back to the side, I liked the ridges running along the top and back, and the deep gouges look really bone like, however the middle section looked too much like veins, rather than bone, so I thought about what to do about that while I continued the bone pattern by filling out the 'Y' shapes and digging deeper sections and patterns in the depressions to give a better illusion of depth and hollowness.
Once that was done, I cut away all the 'veins' from the middle section and tried a new pattern. On the spine I had, I noticed the 'tail bone' section was almost exactly the right size for this area, so I tried copying it, with a bit more stylization.
It was definitely closer, but after all this work I decided it was probably time to take a step back, have a break, and come back to it fresh another day.
Well, it took a long time fixing the mistakes and un-evenness, but I got to place where I felt safe to press on, and learned a valuable lesson. I was also getting used to working in the clay, and found that busting out shapes, removing and adding chunks quickly, worked a lot better than putting something on an area and then agonising over it.
Also, after talking to a few of my arty friends, and getting some feedback, I decided that in my initial shape was too face heavy, and looking at the art in the graphics novels, the face is generally small, while the back of the head sweeps to a more bulbous shape. A strong 'Silhouette' is one of the cornerstones of art in making something instantly recognisable, if you don't know much about it, I'd advise reading up, it might change your direction, like it did mine.
I reformed it with that in mind, check it out...
Now that that was over with, and I was pretty sure I had the right 'base shape', I started working on the detail. Basing the concept on the 'old god' theme, I knew I wanted something supernatural and evil looking, so I thought perhaps some kind of reptilian scale or bone would look suitably creepy. The eyebrows seemed like a good place to start...
Once I was done with that, I moved onto continuing up the forehead ridge.
At this point, it's still important to note that I was feeling more confident about experimenting, cutting bits out and having a look at it was feeling less and less worrisome for me, and undo-ing problem or aesthetically displeasing parts was getting easier. After roughing out the basic shape, I decided I'd continue the 'spine' feel along the sides of the head, so I started gouging out bits near the temple to see how it would turn out.
Work work. As I left this, I was really looking forward to coming back for more.


